
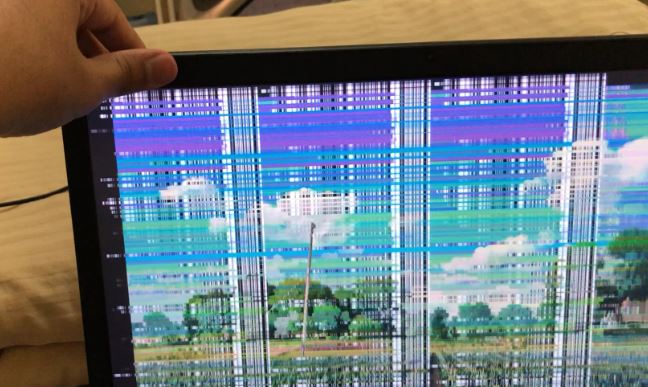
A laptop screen that is flickering is undoubtedly the cause of computer issues. It can ruin office productivity and make watching films on the couch a major hassle.
You will need an immediate answer as soon as the blinking starts because it simply serves to annoy and frustrate you.
You’ve come to the right place if you recently made the switch from Windows 10 to Windows 11, or if your new Windows 11 laptop is experiencing screen flickering.
We have outlined the main reasons why screen flickering occurs on Windows computers and provided some helpful fixes to assist you in resolving the issue.
A trip to the PC repair shop isn’t always necessary to fix a flickering laptop screen. Your blinking screen problem might be resolved by something as simple as continually lowering and raising the screen or updating your graphics card drivers.
However, why do laptop screens flicker in the first place, and what are the several treatments that can stop it?
What Causes Screen Flickering in Windows 11?
The main causes of screen flickering are out-of-date graphics drivers and unsuitable programs.
In this post, we’ve covered all the potential reasons your Windows 11 computer’s screen can flicker as well as how to correct them.
If there is not a hardware issue, some simple troubleshooting techniques can be used to stop the screen from flickering.
Restarting the computer, altering the screen refresh rate, and reconnecting wires are all included.
Potential Solutions to Stop Screen Flickering in Windows 11
1. Check the Cables of Your Monitor
The simplest way to fix screen flickering in Windows 11 is to verify that the display wire is connected to your monitor properly before doing any troubleshooting steps.
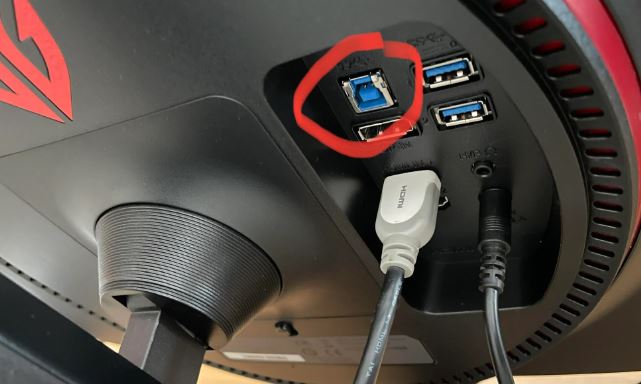
You might try unplugging and reconnecting the display to your computer.
Check the hinge of your laptop if you are using one; it could be the source of your screen flickering.
2. Change the Accent Color and Background
When you allow Windows 10 to choose the accent color from your wallpaper, it is known to lead to issues with screen flickering.
Unfortunately, Windows 11 still has this problem, therefore if you want to stop the screen from flickering with Windows 11; you should avoid using an automatic accent color.
If you utilize slideshow wallpapers, this technique is useful. To disable automatic accent colors and slideshow wallpapers, take the following actions:
1. Using the Windows 11 keyboard shortcut Win+I, open Settings. From the left sidebar, select the “Personalization” section.
To access the settings for customization, click “Colors” right now.
2. Select “Manual” under “Accent color” from the options screen.
You are now prepared, and this repair should hopefully address Windows 11 screen flickering difficulties.
3. Attempt deactivating the “Slideshow” wallpaper option if that doesn’t work.
Click “Background” in the Personalization options section to remove the slideshow wallpaper setting.
4. Select a picture or a solid color for the background by clicking on the dropdown list next to “Personalize your background” on the right.
In other words, if you have weird screen flickering on Windows 11, you should disable slideshow backgrounds.
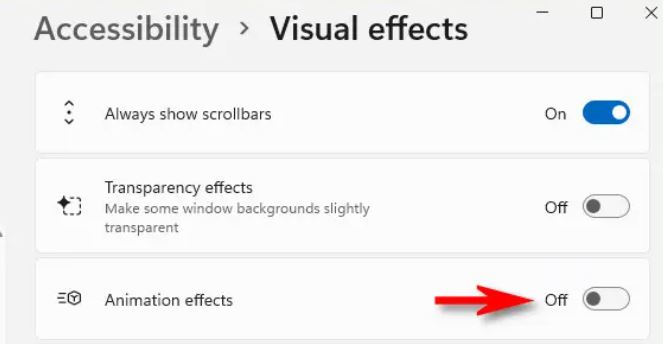
3. Disable Animation Effects
Disabling the animation effects on your Windows 11 computer is another potential solution for the screen flickering problem.
The steps to disable animation effects in Windows 11 are listed below:
1. Switch to the “Accessibility” area in the left sidebar of the Settings app by opening it. Then, select “Visual effects” to access the options for the animation effects.
2. At this point, all you need to do is deselect the “Animation effects” toggle. You are done now. Use your Windows 11 computer to see if the screen flickering problem persists.
If this didn’t solve the issue, try the other strategies listed below.
4. Disable Hardware Acceleration in Chrome
Users claim that turning off hardware acceleration solves the screen flickering problem.
The procedure to turn off hardware acceleration in Google Chrome is described in full in this guide.
For information on how to turn off hardware acceleration in Firefox and Edge, go to this manual.
1. Select Settings from the vertical three-dot menu that appears when the Chrome browser is launched.
2. From the left sidebar, select “Advanced” options, and then select the “System” tab. Turn off the toggle for “Use hardware acceleration when available”.
You may now restart Chrome to stop experiencing screen flickering.
5. Update Display Drivers
If none of the suggestions mentioned above worked to solve your issue, you could attempt the tried-and-true driver updating technique.
To resolve the screen flickering problem in this instance, you should update the display and graphics drivers.
Here’s how to upgrade your Windows 11 graphics drivers.
1. Launch Device Manager by typing “devmgmt.msc” in the Run window using the Windows 11 keyboard shortcut Win+R.
2. Right-click on your computer’s graphics card after expanding the Display Adapters section.
To update your display drivers, select “Update driver” from the dialogue box that displays.
3. When the pop-up window opens, you can decide whether to manually find and install the necessary drivers from your PC or to let the computer automatically search the Internet for them.
Additionally, you might use the Settings app to check for driver updates in the “Optional updates” part of the “Windows Update” page.
The procedures listed above emphasize the typical way to update graphics drivers.
6. Uninstall Incompatible Apps
The screen flickering problem on your Windows 11 computer may be brought on by a recently installed incompatible app.
To remove the flickering, we advise you to try deleting any apps you installed recently.
How to uninstall apps on Windows 11 is as follows:
Open the Settings app, and select “Installed” from the left sidebar’s Apps section to view a list of all the apps you have installed on your computer.
2. Click on the “Sort by” drop-down box and select the Last installed option to make it simpler to find the program you just installed.
3. At this point, select “Uninstall” from the menu that appears when you click on the three dots next to each app’s name to get rid of it from your Windows 11 computer.
7. Adjust Refresh Rate
1. Launch the Settings application and select Display.
2. Find the Advanced display setting under “Related settings” by scrolling down.
3. A menu option to “Choose a refresh rate” will now appear. You can try selecting a different screen refresh rate by clicking the dropdown list next to this choice.
This procedure ought to resolve the problem if the screen flickering was brought on by the refresh rate of your monitor.
Final Verdict
The problem of a flickering screen is not only bothersome, but it also makes you fear that there is a serious hardware issue with your computer.
However, it isn’t always the case. Whatever the cause of your screen flickering problems in Windows 11, one of the solutions above will undoubtedly work for you.
One at a time, test out the fixes to see which one works best for you.