
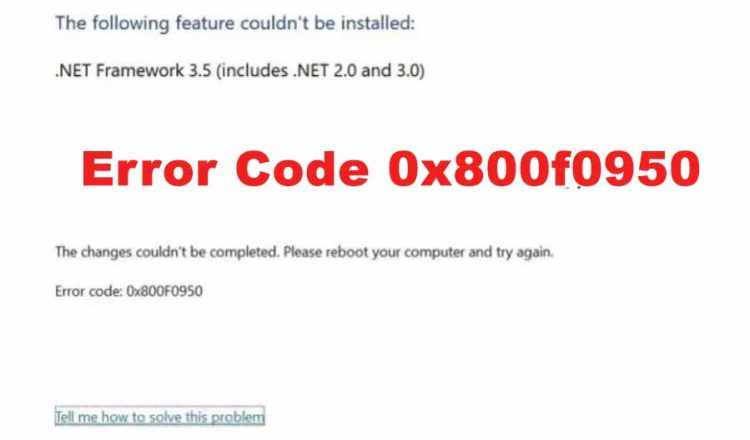
The error code 0x800F0950 appears on Windows 10 and Windows 11 when attempting to launch a game or application that needs the.NET 3.5 Framework or to install the framework using the standard installer.
‘The following feature couldn’t be installed’ is the error message that appears along with the problem code.
After closely researching this problem and attempting to reproduce it on computers running Windows 10 and Windows 11,
It has been established that a number of different scenarios are probably to blame for the error code 0x800F0950.
Reasons Behind Error Code 0x800F0950
1. Missing 3.5 .NET Framework
If you encounter this issue when attempting to run a program that relies on Windows 10, you merely need to begin the installation from the Windows Features page.
This will ultimately get around any problems you might be encountering with Windows Installer right now.
2. Missing 4.8 .NET Framework
If you started seeing this issue after updating to Windows 11, it’s likely that your OS lacks the most recent.NET framework package.
Even if the issue indicates the.NET 3.5 version, you must make sure you have installed the most recent version via authorized channels.
3. Remnants from a previous .NET Framework installation
It turns out that you may see this problem if you have previously dealt with a botched.NET installation,
Alternatively, have attempted to delete a Framework package but was unsuccessful since the installer is preventing the installation of new files because of leftover corrupted equivalents.
Running the.NET Framework Repair Tool will allow you to resolve the situation in this situation.
4. Outdated Windows build
An old OS build is another underlying factor that could cause the.NET framework installation to fail.
The user’s attempt to install a.NET Framework that is not supported by the OS build frequently causes the
Installation to fail (on Windows 10 and 11). If this happens, you can address the problem by first installing all pending Windows updates before attempting the.NET framework installation.
5. .NET Framework is waiting to be installed via WU
Some affected users claim that you may also anticipate this problem happening when the exact.NET Framework package you are trying to install has already been downloaded and is waiting to be installed via WU.
In this situation, updating all of your software and restarting your computer should automatically resolve the problem.
6. Corrupted Windows Installer Component
If you have a corrupted Windows Installer component and are unable to install the.NET framework as a result,
One option to totally get around the problem is to handle the installation from a compliant Windows 10 or Windows 11 installation disc through DISM.
If the DISM component is also impacted, you can also make a custom installation script and run it from an elevated CMD prompt.
7. System File Corruption
If you end up trying out every feasible method to get past the error code and finish the installation of the pending .NET framework and none works,
The only viable solution left to you is to do a repair install in order to refresh every compromised Windows component.
Now that you are familiar with every probable situation that can create this issue.
How to Fix Error Code 0x800F0950
1. Install .NET Framework 4.8 from DotNET (Windows 11 Only)
Keep in mind that users who attempt to launch a game that requires .NET Framework version 3.5 are known to have the 0x800F0950 error on Windows 11.
The catch with Windows 11 is that each newer version is necessary in order to run the game, so you no longer just need the required version to start it.
If you find yourself in this situation, you ought to be able to resolve it by visiting the DotNET homepage and downloading the 4.8.NET Framework Runtime from the official server.
Learn how to do this by following the step-by-step steps listed below:
- Open any web browser of your choice and view the download page of DotNET Framework 4.8.
- Once you are in, hit on the Download .NET Framework 4.8 Runtime button.
- After the download has finished, double-click on the file that you have just downloaded and allow the UAC (User Account Control) prompt.
- Inside the installation window, continue the remaining instructions to wrap up the installation of .NET Framework 4.8.
- Once the process is complete, restart your system and see if the problem is now resolved.
In case the exact same 0x800F0950 error persists, move down to the next probable repair below.
2. Running the .NET Framework Repair Tool
If your earlier attempts at installing a .NET Framework version got halted by an unexpected shutdown or anything similar,
it’s probable that you’re dealing with some kind of residual files that are hindering the installation of new .NET framework instances.
The best course of action in this situation is to use the Microsoft.NET Framework Repair Tool.
Moreover, apply the recommended patch in order to delete the leftover files and data clusters that might be responsible for the apparition of the 0x800F0950.
Update: The program can be used on both Windows 10 and Windows 11. The instructions are essentially the same.
Follow the steps below to download and run the .NET Framework Repair Tool:
- Access the Microsoft.NET Framework Repair tool download page using any browser.
- Click the Download button under Microsoft.NET Framework Repair Tool once you’ve landed on the relevant page.
- Once the download is finished, double-click the NetFxRepairTool icon and select yes to allow administrative access when prompted by User Account Control.
- Once the initial scan is finished, implement the suggested repair techniques by following the on-screen directions to deploy the repair application.
- Reboot your computer once more after implementing the suggested repair techniques, and when the subsequent startup is complete, attempt the installation of the .NET framework once more.
If the same kind of issue is still present, proceed to the next possible solution below.
3. Install .NET Framework 3.5 using Windows Features (Windows 10 Only)
If you are getting this error message while trying to install the .NET Framework version 3.5 from an installer you’ve downloaded with your web browser,
You might be able to bypass the problem totally by installing it through the Windows Features menu.
Note: Windows 11 features a newer version of this framework loaded and enabled by default,
Therefore, no additional action is required on your part to guarantee it’s available to the apps that need it.
Remember that the.NET Framework version 3.5 archive already exists in Windows 10; you only need to prompt it to install.
For installing the .NET Framework 3.5 via the Windows Features panel, follow the instructions below:
- Open up a Run dialog box by pressing the Windows key + R. Next, put ‘appwiz.cpl within the text box and click Enter to open up the Programs and Features menu.
- Type appwiz.cpl and Press Enter to Open Installed Programs List
- Once you’re within the Programs and Features menu, utilize the menu on the right to click on Turn Windows features on or off.
- When you are inside the Windows features screen, start by ticking the box associated with .NET Framework 3.5 (this package contains .NET 2.0 and 3.0), then click Ok to save the modifications.
- At the confirmation box, click Yes to commence the procedure, then wait for the package to be successfully installed.
Once the procedure is complete, reboot your computer and observe if the problem is fixed once the next startup is complete.
In case this approach was not relevant, you encountered a different error,
If you are intending on installing the .NET Framework 3.5 package from the file you previously downloaded, proceed down to the next possible fix.
4. Install Every Pending Windows Update
When you try to install the.NET Framework 3.5 update, the fact that Windows Update already has a planned update prepared to perform the same action could be one factor that results in the 0x800F0950 issue.
After updating their Windows 10 or 11 version to the most recent release, some users who were experiencing the same error code said they were able to solve the problem.
Most users have claimed that after doing this and rebooting their computer,.NET Framework 3.5 was already installed, negating the need to utilize the specific installer.
Note: Both versions of Windows have the same steps for installing any pending updates.
- Open up a Run dialog box by hitting the Windows key + R.
Next, put ‘ms-settings: windows update within the text box and hit Enter to open up the Windows Update tab of the Settings app.
- Inside the Windows Update screen, move over to the right-hand section and tap on Look for Updates.
- Next, follow the on-screen directions to install each pending update until you bring your machine up to date.
Note: In case you are required to restart before you get the chance to install every pending update, restart as told.
However, once the next startup is complete, return to the same Windows Update screen to complete the installation of the remaining updates.
- Once you eventually manage to apply every pending Windows update, you should see that the .NET Framework 3.5 was already installed via the Windows Update component.
If this didn’t happen or you weren’t ready to install the Windows Updates that are presently pending, go down to the next possible repair below.
5. Installing NET Framework via Installation Media
If the first two solutions didn’t help, forcing a compatible installation media to do the NET Framework installation for you from an elevated Command Prompt
Or Powershell window is a workable workaround that many people have used successfully.
This is a faster alternative to the approach below provided you already have appropriate installation discs.
You can attempt this way by installing the.NET Framework 3.5 version straight from a compatible installation disc by following the steps listed below:
Note: You may follow the steps below on both Windows 10 and Windows 11. Just make sure you use an appropriate installation media.
1. Insert the relevant installation media in your DVD drive, or flash drive, or mount it in case you are using an ISO.
2. To bring up the Run dialogue window, press the Windows key + R. To open an elevated Command Prompt, type “cmd” into the text box and press Ctrl + Shift + Enter.
When you encounter the UAC (User Account Prompt), click yes to grant administrator privileges.
Note: Type “PowerShell” instead of “cmd” if you wish to use Powershell.
1. Once you’re inside the elevated CMD prompt, type the following command and change ‘XXX‘ with the letter that is presently holding the installation media:
Dism /online /enable-feature /featurename: NetFX3 /All /Source: XXX: \sources\sxs /LimitAccess.
- Press Enter to commence this process, then wait for the operation to complete.
Once the installation is complete, restart your computer and test if the NET framework was installed correctly once the next startup is complete.
Continue to the next possible solution below if you still get the 0x800F0950 error or the installation failed with a different error number.
6. Performing a Repair Install
If none of the suggestions listed above have worked for you, you most likely have corruption of some form that won’t go away on its own.
This time, you should reset all Windows-related files in an effort to fix the 0x800F0950 error code.
You can perform this with a clean install, but we advise against it and suggest an in-place repair or repair install.
A repair install will only touch OS components, leaving personal files, programs, and games unaffected,
In contrast to a clean install, which will wipe everything on your OS drive unless you have a backup of it first.
Final Verdict
Ideally, the answers were effective in resolving the error message. By default, Windows 11 features the newest .NET Framework.
However, you might need to update the version with the latest operating system update.